In this article
- Local access and public access are not the same thing
- Check your public IP address
- The dynamic IP problem
- The CGNAT problem
- Set a fixed local IP for your Ubuntu server
- Set up public DNS
- Root domain versus www
- Lower the TTL while testing
- DNS does not serve your website
- Set up the Apache virtual host
- Test Apache locally first
- Set up port forwarding on your router
- Do not forward random services
- Open the firewall on Ubuntu
- Add SSL with Let’s Encrypt
- Test from outside your network
- Check the logs when something fails
- A practical troubleshooting checklist
- Common problems and what they usually mean
- A safer default setup
- Safer alternatives to public port forwarding
- The simple mental model
- Final takeaway
Setting up an Ubuntu home server is one thing.
Getting a real domain to reach it from the public internet is another thing entirely.
This is where a lot of beginner home-server projects get confusing, because people treat “put my site online” as one job.
It isn’t.
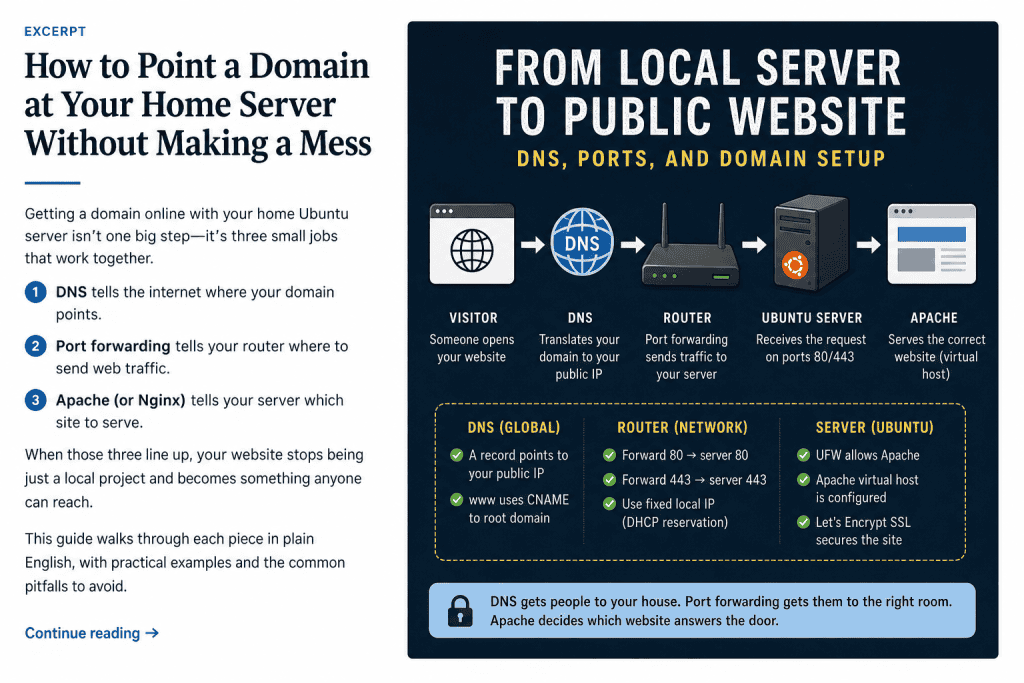
It’s really three separate jobs that need to line up:
- DNS tells the internet where your domain points.
- Port forwarding tells your router where to send web traffic.
- Apache or Nginx tells your server which site to serve.
Once you understand those three pieces, the whole thing becomes much less mysterious.
The basic flow looks like this:
visitor
  → domain DNS
  → your public IP address
  → router port forward
  → Ubuntu server
  → Apache virtual host
  → website
Or, less technically:
DNS gets people to your house. Port forwarding gets them to the right room. Apache decides which website answers the door.
That’s the idea.
This guide assumes you already have an Ubuntu server running at home, Apache installed, and a basic website working locally. If your server isn’t reachable on your home network yet, fix that first.
Public DNS won’t save a local setup that doesn’t work.
Annoying, but true.
Local access and public access are not the same thing
When you visit your server from inside your house, you’re probably using an address like this:
192.168.1.50or:
http://ubuntu-server.localThat works because you’re on the same private network as the server.
But 192.168.x.x, 10.x.x.x, and 172.16.x.x style addresses are private network addresses. They are not reachable from the public internet. You can use them inside your house, but someone outside your network can’t type 192.168.1.50 and magically land on your server.
A public domain needs to point to your router’s public IP address, not the private IP address of the Ubuntu server.
That distinction matters.
Your home network usually looks something like this:
Internet
  ↓
Your ISP
  ↓
Your router public IP
  ↓
Your home router
  ↓
Ubuntu server private IP: 192.168.1.50
Your router is the device the public internet can see.
Your Ubuntu server sits behind it.
So the job is not this:
example.com → 192.168.1.50The job is this:
example.com → your public IP → router forwards traffic → 192.168.1.50That’s the bit beginners often miss.
And to be fair, it is not exactly obvious until someone explains it without acting like you were born knowing router NAT rules.
Check your public IP address
Before touching DNS, you need to know your current public IP address.
The easy way is to visit a “what is my IP” site from a device connected to your home internet.
You can also run this from your Ubuntu server:
curl ifconfig.meor:
curl https://icanhazip.comThat should return an IP address that looks something like this:
203.0.113.24That is the address your DNS A record will point to.
At least, that’s the simple version.
There are two common problems here:
- dynamic IP addresses
- CGNAT
Both can make a perfectly sensible setup look broken.
Because networking enjoys comedy, apparently.
The dynamic IP problem
Many home internet connections don’t give you a permanent public IP.
Your public IP can change when your router restarts, when your ISP refreshes your connection, or just whenever your ISP decides to move things around.
If your domain points to your current IP and that IP changes later, your domain will keep pointing to the old address.
That means your site stops working.
You have a few options.
Option 1: Ask your ISP for a static IP
This is the cleanest option if your ISP offers it.
A static IP means your public IP stays the same. It’s usually a paid add-on, and not every residential ISP offers it, but it makes self-hosting much simpler.
Not exciting. Very useful.
A classic combination.
Option 2: Use dynamic DNS
Dynamic DNS updates a hostname whenever your public IP changes.
The idea is:
your home IP changes
  → dynamic DNS client notices
  → DNS record gets updated
  → domain points to the new IP
Some routers have built-in dynamic DNS support. You can also run a small updater on your Ubuntu server. Some DNS providers offer their own API-based update options.
This is a good middle ground for home servers.
Option 3: Use a tunnel instead
If you don’t want to deal with public IPs, router rules, or ISP weirdness, use something like Cloudflare Tunnel or Tailscale Funnel.
More on that later.
Cloudflare Tunnel can publish an application by mapping a public hostname to a local service, such as http://localhost:8080.
Tailscale Funnel can expose a local resource to the internet through a Funnel URL.
Both are useful options when normal port forwarding is more trouble than it’s worth.
The CGNAT problem
CGNAT is where things get annoying.
CGNAT stands for Carrier-Grade Network Address Translation.
In plain English, it means your ISP may be putting your home connection behind another layer of NAT before it reaches the public internet.
If you’re behind CGNAT, normal port forwarding may not work, because your router doesn’t actually have a true public IPv4 address.
A simple way to check is to compare:
- The public IP shown by a “what is my IP” website.
- The WAN or internet IP shown inside your router admin page.
If they don’t match, or if your router’s WAN address is in a private or shared range, you may be behind CGNAT.
This is one of those problems where you can do everything “right” and still not get inbound traffic working.
Very character-building. Also irritating.
Your options are usually:
- ask your ISP for a real public IP or static IP
- use IPv6 if your ISP supports it and you know what you’re doing
- use Cloudflare Tunnel
- use Tailscale Funnel
- host the public version on a cheap VPS instead
For many home users, a tunnel is less painful than fighting CGNAT.
Set a fixed local IP for your Ubuntu server
Before setting up port forwarding, make sure your Ubuntu server keeps the same private IP address.
If your server is 192.168.1.50 today but becomes 192.168.1.87 next week, your router’s port forwarding rule will point to the wrong device.
The clean way to avoid this is to create a DHCP reservation in your router.
That means your router always gives the same local IP to your Ubuntu server.
For example:
Ubuntu server MAC address → always gets 192.168.1.50You can also set a static IP directly on Ubuntu, but for most home networks I prefer a DHCP reservation in the router.
It keeps the network rules in one place and avoids accidental address conflicts.
Once that’s done, write the IP down:
Ubuntu server local IP: 192.168.1.50You’ll need it for port forwarding.
And probably again later when something breaks and you mutter “what IP did I give that thing?” into the void.
Set up public DNS
DNS is the part that connects your domain name to your home internet connection.
For a basic home-hosted website, you usually need two records:
example.com      A      your.public.ip.address
www.example.com  CNAME  example.com
The A record points a domain name to an IPv4 address.
The CNAME record makes one hostname an alias of another hostname. For example, www.example.com can point to example.com, and then example.com points to your IP address.
In your DNS provider, it may look like this:
Type    Name    Value
A       @       203.0.113.24
CNAME   www     example.com
The @ usually means the root domain.
So:
@   = example.com
www = www.example.com
Different DNS providers have slightly different dashboards, because apparently making every interface use the same words would be too kind.
But the idea is the same.
Root domain versus www
You’ll usually want both of these to work:
example.com
www.example.com
The root domain is sometimes called the apex domain or naked domain.
The www version is just a subdomain.
For a simple home server setup, I’d usually do this:
example.com      A      your.public.ip.address
www.example.com  CNAME  example.com
Then configure Apache to accept both names.
That way visitors can type either version and still reach the site.
Later, you can decide whether you want to redirect one version to the other.
For example:
www.example.com → example.comor:
example.com → www.example.comDon’t worry about that yet.
First, make both work.
Then get fussy.
Lower the TTL while testing
TTL means “time to live”.
It controls how long DNS results can be cached. A longer TTL can make DNS lookups more efficient, but it also means changes may take longer to reach users.
When you’re testing, use a low TTL if your DNS provider allows it.
Something like this is fine:
300 secondsor:
5 minutesThat way, if you make a mistake, you’re not waiting hours for the correction to show up.
Once everything works, you can raise it later.
This is one of those tiny settings that can save you a surprising amount of swearing.
DNS does not serve your website
This is worth saying clearly.
DNS does not host your site.
DNS does not configure Apache.
DNS does not open ports.
DNS does one job:
domain name → IP addressThat’s it.
If your DNS is correct but your router isn’t forwarding traffic, the site still won’t work.
If your router is forwarding traffic but Apache doesn’t have the right virtual host, the wrong site may show.
If Apache is correct but your firewall blocks port 80 or 443, the browser still won’t connect.
This is why the three-part framing helps:
DNS → router → web serverEach part has a separate job.
Debug them separately, or you’ll end up clicking random settings like you’re trying to defuse a bomb in a film.
Set up the Apache virtual host
Once traffic reaches your Ubuntu server, Apache needs to know which website to serve.
Apache supports name-based virtual hosting, where multiple hostnames can be served from the same IP address.
Create a folder for your site:
sudo mkdir -p /var/www/example.com/publicCreate a simple test page:
echo "<h1>example.com is working</h1>" | sudo tee /var/www/example.com/public/index.htmlSet ownership.
Replace youruser with your Ubuntu username:
sudo chown -R youruser:www-data /var/www/example.com
sudo chmod -R 755 /var/www/example.com
Now create the Apache config file:
sudo nano /etc/apache2/sites-available/example.com.confAdd this:
<VirtualHost *:80>
    ServerName example.com
    ServerAlias www.example.com
    DocumentRoot /var/www/example.com/public

    <Directory /var/www/example.com/public>
        AllowOverride All
        Require all granted
    </Directory>

    ErrorLog ${APACHE_LOG_DIR}/example.com-error.log
    CustomLog ${APACHE_LOG_DIR}/example.com-access.log combined
</VirtualHost>
Enable the site:
sudo a2ensite example.com.confYou may also want to disable the default site:
sudo a2dissite 000-default.confThen test the Apache config:
sudo apache2ctl configtestIf it says Syntax OK, reload Apache:
sudo systemctl reload apache2Now Apache is ready to answer requests for:
example.com
www.example.com
At least on port 80.
HTTPS comes later.
Do not start with HTTPS while basic HTTP is still broken. That way lies confusion, Certbot errors, and a strong urge to blame DNS for things DNS did not do.
Test Apache locally first
Before you blame DNS, your ISP, your router, or the moon, test Apache from inside your home network.
From another device on your network, visit:
http://192.168.1.50If that doesn’t work, the public domain definitely won’t work yet.
You can also test from the server itself:
curl http://localhostAnd if you want to test the virtual host name before DNS is fully working, use:
curl -H "Host: example.com" http://localhostThat tells Apache:
Pretend this request is for example.com.
If the correct page comes back, Apache is probably doing its job.
That’s good.
It means the problem, if there still is one, is probably further up the chain.
Set up port forwarding on your router
Now you need to tell your router what to do with incoming web traffic.
A normal website uses:
HTTP  → port 80
HTTPS → port 443
Your router receives that traffic first. Without a port forwarding rule, it doesn’t know which device inside your home should receive it.
You want rules like this:
External port 80  → Ubuntu server IP port 80
External port 443 → Ubuntu server IP port 443
Using the earlier example:
External 80  → 192.168.1.50:80
External 443 → 192.168.1.50:443
Your router may call this:
- port forwarding
- NAT forwarding
- virtual server
- port mapping
- applications and gaming
- firewall rules
Every router UI is slightly different, because apparently router manufacturers all got together and agreed to make this part annoying.
The important fields are usually:
Service name: HTTP
External port: 80
Internal IP: 192.168.1.50
Internal port: 80
Protocol: TCP
And:
Service name: HTTPS
External port: 443
Internal IP: 192.168.1.50
Internal port: 443
Protocol: TCP
Use TCP, not UDP, for normal web traffic.
Do not forward random services
This is the part where it’s worth slowing down.
Forwarding port 80 and 443 for a public website is normal.
Forwarding random admin tools is how you turn a fun home-server project into a bad weekend.
Do not casually expose:
- MySQL:
3306 - PostgreSQL:
5432 - phpMyAdmin
- Adminer
- Redis
- MongoDB
- SSH
- development servers
- Docker dashboards
- private admin panels
Could you expose some of those safely with the right setup?
Sometimes.
Should a beginner do it casually because “it works”?
No.
Keep public access boring:
80  → public HTTP
443 → public HTTPS
Everything else should stay private unless you have a very specific reason and know how you’re securing it.
If you need remote admin access, use SSH with keys and proper hardening, or use a VPN-style tool like Tailscale instead of exposing admin panels to the public internet.
The internet is full of bored machines looking for mistakes.
Don’t hand them a menu.
Open the firewall on Ubuntu
If you’re using UFW on Ubuntu, the router may forward traffic correctly but Ubuntu may still block it.
Ubuntu’s documentation describes UFW as a tool for making firewall rule management easier. In practice, it is the thing that can quietly say “no” even when everything else looks right.
To allow Apache traffic for both HTTP and HTTPS:
sudo ufw allow "Apache Full"Check the status:
sudo ufw statusYou should see something like:
Apache Full              ALLOW       Anywhere
Apache Full (v6)         ALLOW       Anywhere (v6)
If UFW is not enabled yet, be careful before enabling it over SSH.
Make sure SSH is allowed first:
sudo ufw allow OpenSSH
sudo ufw allow "Apache Full"
sudo ufw enable
Then check:
sudo ufw status verboseAgain: don’t lock yourself out of your own server.
That’s a classic server-admin rite of passage, but you don’t need to speedrun it.
Add SSL with Let’s Encrypt
Once your domain reaches your server over HTTP, you can add HTTPS.
Let’s Encrypt is a free certificate authority, and Certbot is the common tool used to obtain and install Let’s Encrypt certificates.
Install Certbot and the Apache plugin:
sudo apt update
sudo apt install certbot python3-certbot-apache
Then request a certificate:
sudo certbot --apache -d example.com -d www.example.comCertbot will try to verify that you control the domain.
For the standard HTTP validation flow, your domain usually needs to reach your server on port 80.
That means these must already work:
- DNS points to your public IP
- router forwards port 80
- Ubuntu firewall allows port 80
- Apache serves the site
If any of those are broken, SSL setup will probably fail.
After Certbot succeeds, it will update your Apache configuration and set up HTTPS. It may also offer to redirect HTTP to HTTPS.
Test renewal:
sudo certbot renew --dry-runThat checks whether automatic renewal is likely to work when the certificate needs refreshing.
The practical rule is simple:
Get HTTP working first. Then add HTTPS.
It is much easier to debug one problem at a time.
Test from outside your network
This is important.
Don’t only test from your home Wi-Fi.
Some routers support NAT loopback, which means your domain may work from inside your network even if it doesn’t work properly from outside.
Other routers don’t support it, which means your domain may fail inside the network but work fine outside.
Helpful, obviously.
The clean test is:
- Turn off Wi-Fi on your phone.
- Use mobile data.
- Visit
http://example.com. - Visit
https://example.com. - Test the
wwwversions too.
Test all of these:
http://example.com
https://example.com
http://www.example.com
https://www.example.com
If it works on mobile data, you’ve proven the public path works.
You can also use DNS checker tools to confirm your domain is resolving to the expected public IP from different locations.
Check the logs when something fails
Logs are boring until they save you an hour.
For Apache access logs:
sudo tail -f /var/log/apache2/example.com-access.logFor Apache error logs:
sudo tail -f /var/log/apache2/example.com-error.logFor general Apache logs:
sudo tail -f /var/log/apache2/access.log
sudo tail -f /var/log/apache2/error.log
Now try loading the site from outside your network.
If nothing appears in the logs, the request probably isn’t reaching Apache.
That points to:
- DNS
- public IP
- router forwarding
- ISP blocking
- CGNAT
- Ubuntu firewall
If the request appears in the logs but the wrong site loads, the issue is probably Apache virtual host configuration.
If the request appears and returns an error, Apache is receiving the traffic and your problem is likely inside the site config, permissions, app code, or document root.
That’s good news, weirdly.
It means the network path is working.
You have moved from “internet mystery” to “server problem”, which is not fun exactly, but it is at least a smaller sort of pain.
A practical troubleshooting checklist
When your domain doesn’t work, don’t randomly change five things at once.
Work through the path in order.
1. Does the site work locally on the server?
Run:
curl http://localhostIf this fails, fix Apache before touching DNS or the router.
2. Does the site work from another device at home?
Visit:
http://192.168.1.50If this fails, check Apache, UFW, and your server’s local IP.
3. Does Apache recognise the domain?
Run:
curl -H "Host: example.com" http://localhostIf this returns the wrong site, check your virtual host.
4. Does DNS point to your public IP?
Check your DNS provider.
You want:
example.com → your public IPNot:
example.com → 192.168.1.50Never point public DNS at your private LAN address.
5. Is the router forwarding ports 80 and 443?
Check that the rules point to the right local IP.
80  → 192.168.1.50:80
443 → 192.168.1.50:443
If your server’s local IP changed, fix that with a DHCP reservation.
6. Is UFW allowing Apache?
Run:
sudo ufw statusMake sure Apache Full or equivalent port rules are allowed.
7. Are you behind CGNAT?
Compare your router WAN IP with your public IP from a “what is my IP” site.
If they don’t match, this may be the problem.
8. Is your ISP blocking inbound ports?
Some ISPs block inbound port 80, especially on residential connections.
If port 443 works but port 80 doesn’t, or neither works despite correct configuration, check your ISP’s policy.
9. Has DNS actually updated?
DNS changes can take time depending on TTL, caching, and provider behaviour.
Lower TTL helps while testing, but cached results can still linger for a while.
10. Is SSL failing because HTTP is broken?
Certbot’s normal Apache flow expects the site to already be reachable.
If http://example.com doesn’t reach your server, don’t start with Certbot.
Fix plain HTTP first.
Boring order. Better outcome.
Common problems and what they usually mean
The domain points to 192.168.x.x
This is wrong for public DNS.
Your DNS should point to your public IP, not your Ubuntu server’s private IP.
The router forwards to the wrong device
This happens when the server’s local IP changes.
Set a DHCP reservation.
Apache shows the default page
Apache is receiving traffic, but your virtual host probably isn’t enabled or isn’t matching the domain.
Check:
sudo apache2ctl -SThat shows which virtual hosts Apache knows about.
Certbot fails validation
Usually this means the domain does not currently reach your server over port 80.
Check DNS, port forwarding, UFW, and Apache before retrying.
The site works at home but not outside
Possible causes include:
- router NAT loopback confusion
- port forwarding not working
- ISP blocks inbound traffic
- CGNAT
- firewall issue
Test from mobile data.
The site works outside but not inside
Your router may not support NAT loopback.
You can either live with it, use local DNS, edit your local hosts file for testing, or access the server locally by its private IP when you’re at home.
HTTPS works but HTTP doesn’t
You may have a redirect or firewall rule issue.
Also check whether port 80 is open, because Certbot renewals using HTTP validation may need it.
The wrong site loads
Apache virtual host matching is probably off.
Check:
sudo apache2ctl -SMake sure ServerName and ServerAlias match the domain you’re visiting.
A safer default setup
For a basic public home-hosted website, I’d keep the public surface area small.
Public:
80HTTP443HTTPS
Private:
- SSH
- database
- admin panels
- dev tools
- dashboards
Then I’d use:
- SSH keys, not password login
- UFW enabled
- automatic security updates
- regular backups
- DHCP reservation for the server
- simple Apache virtual hosts
- Let’s Encrypt for HTTPS
- a tunnel or VPN for private tools
The goal is not to make your home server “enterprise grade”.
The goal is to avoid silly mistakes.
Silly mistakes are very committed to becoming serious mistakes if you give them enough internet exposure.
Safer alternatives to public port forwarding
Opening your home server to the internet can be useful, but it isn’t always the best option.
Here are the alternatives I’d consider.
Cloudflare Tunnel
Cloudflare Tunnel lets you expose an app through Cloudflare without opening inbound ports on your router.
Instead of the internet connecting directly to your home IP, a local cloudflared service connects out to Cloudflare, and Cloudflare routes the hostname to your local service.
Cloudflare’s current docs describe this as adding a public hostname route that maps a hostname, such as app.example.com, to a local service, such as http://localhost:8080.
This is useful if:
- your ISP uses CGNAT
- you don’t want to open router ports
- you already use Cloudflare for DNS
- you want a simpler public hostname setup
It’s not magic, and you still need to understand what you’re exposing, but it removes a lot of router pain.
Tailscale Funnel
Tailscale Funnel can expose a local service to the broader internet from a device in your Tailscale network.
Tailscale’s docs describe Funnel as exposing a local resource to the internet through a Funnel URL.
This is useful for:
- temporary demos
- sharing a small local service
- testing webhooks
- avoiding router configuration
Tailscale also has private sharing options for things you don’t want fully public.
For private admin tools, that is usually the more sensible direction.
Cheap VPS
A small VPS is often the boring grown-up answer.
For a few dollars a month, you get:
- a real public IP
- cleaner DNS setup
- no home router issues
- no CGNAT problem
- better uptime
- easier separation from your home network
You can still keep your home server for development, backups, private apps, and experiments.
Then use the VPS for public-facing projects.
This is less fun than making the home server do everything, but sometimes boring wins because boring sleeps better.
Private VPN access only
Not every home server app needs to be public.
For personal dashboards, admin tools, databases, notes, internal apps, and experiments, private VPN access is often better.
Use something like:
- Tailscale
- WireGuard
- ZeroTier
Then only your own devices can reach the service.
That’s usually the right answer for admin tools.
If the public does not need it, do not make it public just because you can.
The simple mental model
Here’s the whole setup again:
visitor types example.com
  ↓
DNS resolves example.com to your public IP
  ↓
visitor's browser connects to your router
  ↓
router forwards port 80/443 to your Ubuntu server
  ↓
UFW allows the traffic
  ↓
Apache receives the request
  ↓
Apache matches ServerName or ServerAlias
  ↓
Apache serves files from DocumentRoot
When something breaks, don’t debug it as one giant mystery.
Debug it as a chain.
Ask:
- Did DNS send the visitor to the right public IP?
- Did the router forward the traffic to the right local server?
- Did Ubuntu allow the traffic through the firewall?
- Did Apache match the domain to the right site?
- Did the site itself load correctly?
That’s the workflow.
Not glamorous.
Still better than rage-clicking router settings at 1am while developing a personal grudge against your ISP.
Final takeaway
Pointing a domain at a home server feels confusing because several separate systems have to agree with each other.
DNS has to point to your public IP.
Your router has to forward web traffic to your Ubuntu server.
Ubuntu has to allow the traffic.
Apache has to know which site to serve.
Let’s Encrypt has to be able to reach the domain before it can issue a certificate.
Once you split those into separate jobs, the setup becomes much easier to reason about.
The memorable version:
DNS gets people to your house. Port forwarding gets them to the right room. Apache decides which website answers the door.
That’s the whole guide in one line.